網頁

網頁

[Vue] Global State with Composables

在 Vue Composition API 下,想要有全域狀態,但又不用 Pinia,可以使用下面的方法:

// 檔名:useTest.js

import { ref, readonly } from 'vue';

// 有 import 這個檔案的 .vue 都可以使用這個 ref
const global = ref(0);

export function useTest() {
  // import 這個檔案的 .vue 檔,各自有這個 ref
  const count = ref(0);

  const countPlus = () => {
    count.value++;
  };

  const globalPlus = () => {
    global.value++;
  };

  return {
    // 設定全域 ref 唯讀,只能透過 return 的 function 修改
    global: readonly(global),
    globalPlus,
    count,
    countPlus
  };
}


參考連結:

網頁

Vue 3.4

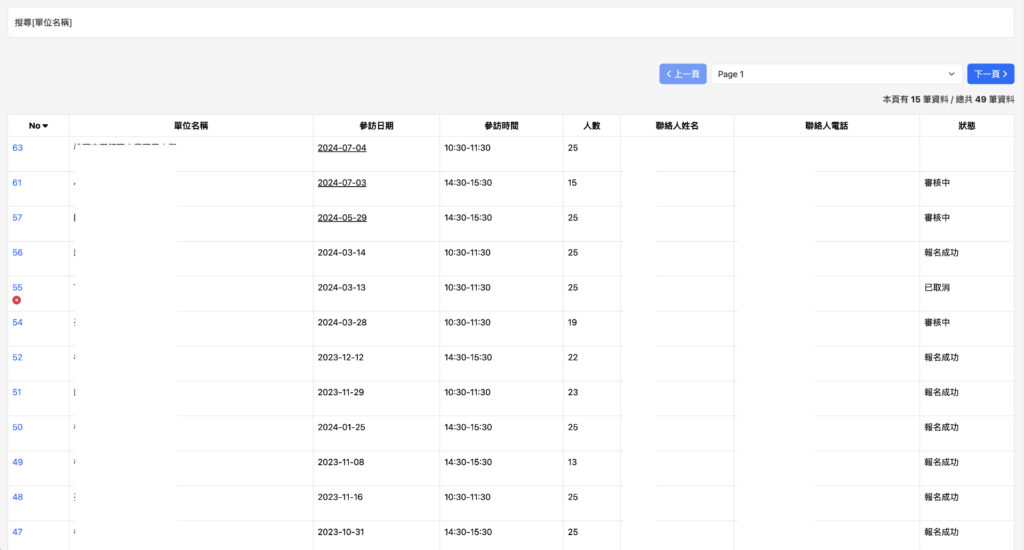
把公司參訪報名管理頁的 Vue 升到 3.4。

Vue 3.4 可以在 Component 上使用 v-model 的時候,少寫幾行 code。

以操作畫面最上方的搜尋功能為例,原本的 code 長這樣….

<script setup>
import { computed } from 'vue';

const props = defineProps({ modelValue: String });
const emit = defineEmits(['update:modelValue']);

const searchString = computed({
  get() {
    return props.modelValue;
  },
  set(newVal) {
    emit('update:modelValue', newVal);
  }
});
</script>

現在只要這樣….

<script setup>
import { defineModel } from 'vue';

const searchString = defineModel({ type: String });
</script>

———

預設的排序是 No 欄位(由大到小),點選參訪日期也可以排序。

參訪日期一開始的排序寫法是:

// 由大到小
[...allData.value].sort((a, b) => {
  if (a['date'] > b['date']) {
    return -1;
  }

  if (b['date'] > a['date']) {
    return 1;
  }

  return 0;
}

後來看到一個比較簡潔的寫法:

// 由大到小
[...allData.value].sort((a, b) => b['date'].localeCompare(a['date']))


參考連結:

網頁

[JS] Promise 亮燈

三秒後亮紅燈,二秒後亮綠燈,一秒後亮黃燈,反覆執行。

// 回傳 promise
function lightPromise(second, light) {
  return new Promise((resolve, reject) => {
    setTimeout(() => {
      resolve(light);
    }, second * 1000);
  });
}

function main() {
  const redPromise = lightPromise(3, '[red]'); // 回傳紅燈 promise

  redPromise
    .then((light) => {
      console.log(light, new Date()); // 亮紅燈

      return lightPromise(2, '[green]'); // 回傳綠燈 promise
    })
    .then((light) => {
      console.log(light, new Date()); // 亮綠燈

      return lightPromise(1, '[yellow]'); / 回傳黃燈 promise
    })
    .then((light) => {
      console.log(light, new Date()); // 亮黃燈
      console.log('---------');
      main(); // 再次執行
    });
}

Demo
https://www.yuantw.com/demo/js-promise-light/


參考連結:

網頁

[JS] Throttle

簡單的版本:

let timeoutId;

btn.addEventListener('click', function (e) {
  if (!timeoutId) {
    console.log(new Date()); // 要執行的動作

    timeoutId = setTimeout(() => {
      timeoutId = null; // reset
    }, 1000);
  }
});

Demo
https://www.yuantw.com/demo/js-throttle-1/

———

Function 版:

function throttle(fn, delay = 1000) {
  let timeoutId;

  return function () {
    let context = this;
    let args = arguments;

    if (!timeoutId) {
      fn.apply(context, args);

      timeoutId = setTimeout(() => {
        timeoutId = null;
      }, delay);
    }
  };
}

function show(e) {
  console.log(`${e.target.dataset.text} --`, new Date());
}

Demo
https://www.yuantw.com/demo/js-throttle-2/

網頁

[CSS] Transition

CSS 的 transition 可以有雙向和單向的設定。

網路上沒有什麼資料,目前只有看到這篇:[CSS筆記] transition、transform、animation 動畫屬性

下面二個都是雙向的例子。

啟動方向回復方向都套用一樣的效果,transition 屬性寫在初始狀態中。

div {
  width: 100px;
  height: 100px;
  
  background: red;
  
  transition: width 2s, height 4s; 
}

div:hover {
  width: 300px;
  height: 500px;
}

Demo
https://www.yuantw.com/demo/css-transition/1.html

———

transition 屬性寫在觸發狀態,會套用在啟動方向。transition 屬性寫在初始狀態,會套用在回復方向

/* 初始狀態 */
div {
  width: 100px;
  height: 100px;

  background: red;

  /* 回復方向 套用 */
  transition: width 5s, height 5s;
}

/* 觸發狀態 */
div:hover {
  width: 300px;
  height: 500px;

  /* 啟動方向 套用 */
  transition: width 2s, height 2s;
}

Demo
https://www.yuantw.com/demo/css-transition/2.html

網頁

[JS] Debounce

以文字輸入框為例,連續輸入時,不會觸發動作(比如:查詢資料庫),要停止輸入並等待一段時間後才觸發動作。

下面的程式會在每次輸入時,清除前一個 setTimeout 並設置一個新的 setTimeout,直到停止輸入,並等待設定的秒數(這個例子是一秒)後觸發動作。

簡單的版本:

let timer;

inputText.addEventListener('input', (e) => {
  clearTimeout(timer);

  timer = setTimeout(() => {
    showArea.textContent = e.target.value; // 要觸發的動作
  }, 1000);
});

Demo
https://www.yuantw.com/demo/js-debounce-1/

———

網路上的資料都是把 debounce 寫成函式:

inputText.addEventListener('input', debounce(showData));

function debounce(fn, delay = 1000) {
  let timer;

  // return 的 function 是 inputText.addEventListener 的 event handler
  return (e) => {
    clearTimeout(timer);

    timer = setTimeout(() => {
      fn(e);
    }, delay);
  };
}

function showData(e) {
  showInfo.textContent = e.target.value;
}

Demo
https://www.yuantw.com/demo/js-debounce-2/

———

上面二個例子的行為是,事件連續發生,停止後,只觸發動作一次。

debounce 也可以實作成,立即觸發動作

簡單的版本:

let timeoutID;

btn.addEventListener('click', () => {
  if (!timeoutID) {
    console.log(new Date());
  }

  clearTimeout(timeoutID);

  timeoutID = setTimeout(() => {
    timeoutID = null; // reset
  }, 1000);
});

Demo
https://www.yuantw.com/demo/js-debounce-now-1/

———

下面的程式碼是從 JavaScript30 13 – Slide in on Scroll 修改

function debounce(func, wait = 1000, immediate = true) {
  let timeoutID;

  return (e) => {
    if (immediate && !timeoutID) {
      func(e);
    }

    clearTimeout(timeoutID);

    timeoutID = setTimeout(() => {
      timeoutID = null; // reset

      if (!immediate) {
        func(e);
      }
    }, wait);
  };
}

Demo
https://www.yuantw.com/demo/js-debounce-now-2/


參考連結:
網頁

[PRACTICE] 取得全網頁高度

網頁包含三個 div。

div 的 CSS 設定:

box-sizing: border-box;

width: 300px;
height: 500px;

margin: 20px auto;
padding: 10px;

border: 5px solid #eee;

每個 div 的高度為:border + padding + 內容 = 500px

第一個 div 跟第二個 div 之間的 margin + 第二個 div 跟第三個 div 之間的 margin(div 之間的 margin 會重疊):20px + 20px

再加上第一個 div 的 margin(top) 跟最後一個 div 的 margin(bottom):20px + 20px

全網頁高度為:20px + 500px + 20px + 500px + 20px + 500px + 20px = 1580px

JS 的部份,document.documentElement 指的是 html 元素。

Demo
https://www.yuantw.com/demo/js-offset-height/

網頁

[PRACTICE] Infinity Scroll

跟著 Udemy 的課程 JavaScript Web Projects: 20 Projects to Build Your Portfolio 做練習。

這個練習是從 Unsplash 的 API 取得圖片,當捲軸快滑到底部時,再次從 API 取得圖片。

在 JS 裡有監聽 scroll 事件。

scroll 事件會連續觸發,導致連續跟 Unsplash API 要圖檔,為了避免這個狀況,可以新增一個變數(imgLoadedStatus)當作開關,值為布林值。

Demo
https://www.yuantw.com/demo/infinity-scroll/

返回頂端