系統

監控網路連線狀態

同事有監控網路連線狀態並開關軟體的需求,請我做個小工具。

運作方式:每五秒會 ping 三個 DNS,三個 DNS 都沒回應就判斷網路有問題,會把斷線時間寫入檔案,並關掉指定軟體。三個 DNS 都有回應代表正常。網路有問題又回復連線的話,會等待三十秒再把指定軟體打開。

下面是 Node.js 的 code,有用到 ping 這個 package。

const { execSync, execFile } = require('child_process');
const fs = require('fs');
const ping = require('ping');

const hosts = ['168.95.1.1', '8.8.8.8', '1.1.1.1'];
const appName = 'app.exe';
const appPath = `C:\\Program Files (x86)\\App\\${appName}`;

let status;
let isClosed = false;
let intervalId;
let countdown = 30;

setInterval(() => {
  let onCount = 0;
  let offCount = 0;

  hosts.forEach((host) => {
    ping.sys.probe(host, (isAlive) => {
      if (isAlive) {
        onCount++;
        console.log(`${host} (on)`);

        // 連線正常
        if (onCount >= hosts.length) {
          console.log('--- Status: Online ---');

          // 連線回復
          if (status === 'OFFLINE') {
            status = '';
            console.log('Status: Network Back....');

            // 啟動 app
            launchApp();
          }
        }
      } else {
        offCount++;
        console.log(`${host} (off)`);

        // 連線有問題
        if (offCount >= hosts.length) {
          status = 'OFFLINE';
          console.log(`==== Status: ${status} [${getDateTime()}] ====`);

          // 寫入斷線時間
          logOffline();

          // 關閉 app
          if (!isClosed) {
            closeApp();
          }
        }
      }
    });
  });
}, 5000);

function closeApp() {
  isClosed = true;
  // console.log('closeApp()-isClosed:', isClosed);

  setTimeout(() => {
    console.log('Close App');
    execSync(`taskkill /f /im ${appName} /t`);
  }, 2000);
}

function launchApp() {
  isClosed = false;
  // console.log('launchApp()-isClosed:', isClosed);

  intervalId = setInterval(() => {
    console.log(`Countdown: ${countdown--}`);

    if (countdown === 0) {
      // console.log('clear-intervalId:', intervalId);
      clearInterval(intervalId);

      countdown = 30;

      console.log('Launch App');
      execFile(appPath);
    }
  }, 1000);

  // console.log('set-intervalId:', intervalId);
}

function getDateTime() {
  let today = new Date();

  let year = today.getFullYear();
  let month = ('0' + (today.getMonth() + 1)).slice(-2);
  let date = ('0' + today.getDate()).slice(-2);

  let hours = ('0' + today.getHours()).slice(-2);
  let minutes = ('0' + today.getMinutes()).slice(-2);
  let seconds = ('0' + today.getSeconds()).slice(-2);

  return `${year}-${month}-${date} ${hours}:${minutes}:${seconds}`;
}

function logOffline() {
  const data = `OFFLINE ${getDateTime()}\n`;

  fs.appendFile('offline_log.txt', data, 'utf8', (err) => {
    if (err) {
      console.log('Err:', err);
    }
  });
}


參考連結:

網頁

[Vue] Global State with Composables

在 Vue Composition API 下,想要有全域狀態,但又不用 Pinia,可以使用下面的方法:

// 檔名:useTest.js

import { ref, readonly } from 'vue';

// 有 import 這個檔案的 .vue 都可以使用這個 ref
const global = ref(0);

export function useTest() {
  // import 這個檔案的 .vue 檔,各自有這個 ref
  const count = ref(0);

  const countPlus = () => {
    count.value++;
  };

  const globalPlus = () => {
    global.value++;
  };

  return {
    // 設定全域 ref 唯讀,只能透過 return 的 function 修改
    global: readonly(global),
    globalPlus,
    count,
    countPlus
  };
}


參考連結:

網頁

Vue 3.4

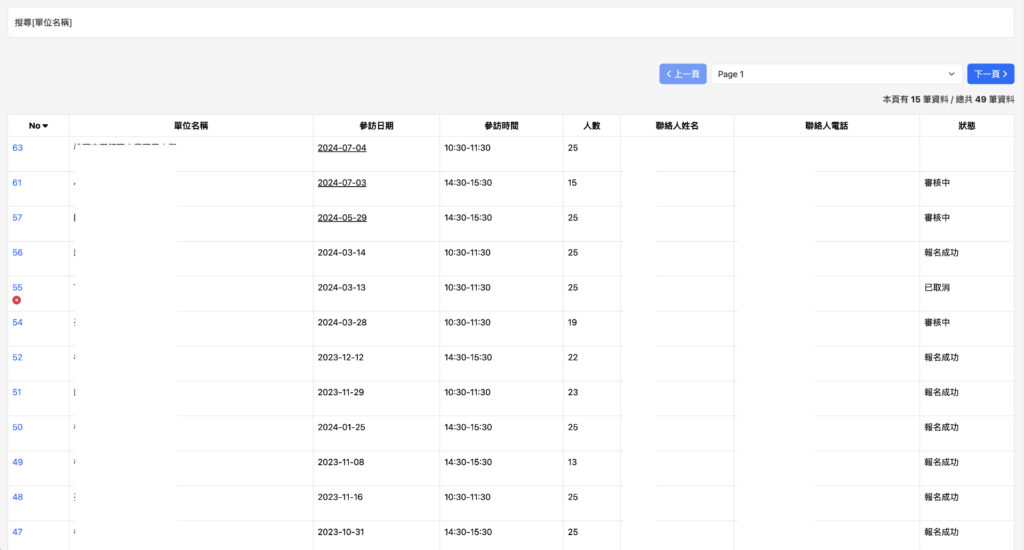
把公司參訪報名管理頁的 Vue 升到 3.4。

Vue 3.4 可以在 Component 上使用 v-model 的時候,少寫幾行 code。

以操作畫面最上方的搜尋功能為例,原本的 code 長這樣….

<script setup>
import { computed } from 'vue';

const props = defineProps({ modelValue: String });
const emit = defineEmits(['update:modelValue']);

const searchString = computed({
  get() {
    return props.modelValue;
  },
  set(newVal) {
    emit('update:modelValue', newVal);
  }
});
</script>

現在只要這樣….

<script setup>
import { defineModel } from 'vue';

const searchString = defineModel({ type: String });
</script>

———

預設的排序是 No 欄位(由大到小),點選參訪日期也可以排序。

參訪日期一開始的排序寫法是:

// 由大到小
[...allData.value].sort((a, b) => {
  if (a['date'] > b['date']) {
    return -1;
  }

  if (b['date'] > a['date']) {
    return 1;
  }

  return 0;
}

後來看到一個比較簡潔的寫法:

// 由大到小
[...allData.value].sort((a, b) => b['date'].localeCompare(a['date']))


參考連結:

系統

Docker LAMP

使用 Docker 建立 Apache、MySQL、PHP 的測試開發環境。

開一個新的資料夾(docker-lamp),並在資料夾內新增下列檔案,檔名必需是 compose.yaml

services:
  db:
    image: mysql
    environment:
      - MYSQL_ROOT_PASSWORD=12345678
      - TZ=Asia/Taipei
    volumes:
      - ./db:/var/lib/mysql

  apache-php:
    build: ./build
    volumes:
      - ./html:/var/www/html
    ports:
      - 80:80

  pma:
    image: phpmyadmin
    environment:
      - PMA_HOST=db
    ports:
      - 8080:80
    depends_on:
      - db

在 docker-lamp 資料夾內新增 build 資料夾,並新增下列檔案,檔名必需是 Dockerfile,用來下載 php-apache 映像檔。

FROM php:8.3-apache

WORKDIR /var/www/html

RUN docker-php-ext-install mysqli pdo pdo_mysql

RUN a2enmod headers \
  && sed -ri -e 's/^([ \t]*)(<\/VirtualHost>)/\1\tHeader set Access-Control-Allow-Origin "*"\n\1\2/g' /etc/apache2/sites-available/*.conf

EXPOSE 80

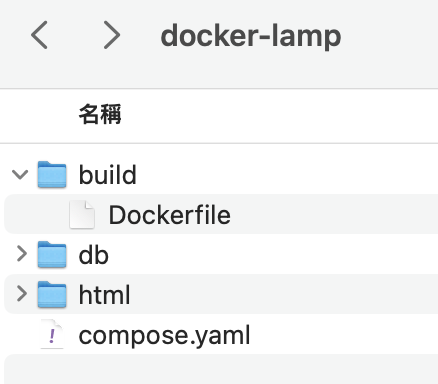
再新增 db、html 資料夾,分別用來存放 MySQL、PHP 檔。

docker-lamp
(資料夾結構)

在命令列模式下,進入 docker-lamp 資料夾,輸入 docker compose up 指令就可以啟動環境。

Download docker-lamp 資料夾

網頁

[JS] Promise 亮燈

三秒後亮紅燈,二秒後亮綠燈,一秒後亮黃燈,反覆執行。

// 回傳 promise
function lightPromise(second, light) {
  return new Promise((resolve, reject) => {
    setTimeout(() => {
      resolve(light);
    }, second * 1000);
  });
}

function main() {
  const redPromise = lightPromise(3, '[red]'); // 回傳紅燈 promise

  redPromise
    .then((light) => {
      console.log(light, new Date()); // 亮紅燈

      return lightPromise(2, '[green]'); // 回傳綠燈 promise
    })
    .then((light) => {
      console.log(light, new Date()); // 亮綠燈

      return lightPromise(1, '[yellow]'); / 回傳黃燈 promise
    })
    .then((light) => {
      console.log(light, new Date()); // 亮黃燈
      console.log('---------');
      main(); // 再次執行
    });
}

Demo
https://www.yuantw.com/demo/js-promise-light/


參考連結:

網頁

[JS] Throttle

簡單的版本:

let timeoutId;

btn.addEventListener('click', function (e) {
  if (!timeoutId) {
    console.log(new Date()); // 要執行的動作

    timeoutId = setTimeout(() => {
      timeoutId = null; // reset
    }, 1000);
  }
});

Demo
https://www.yuantw.com/demo/js-throttle-1/

———

Function 版:

function throttle(fn, delay = 1000) {
  let timeoutId;

  return function () {
    let context = this;
    let args = arguments;

    if (!timeoutId) {
      fn.apply(context, args);

      timeoutId = setTimeout(() => {
        timeoutId = null;
      }, delay);
    }
  };
}

function show(e) {
  console.log(`${e.target.dataset.text} --`, new Date());
}

Demo
https://www.yuantw.com/demo/js-throttle-2/

未分類

2024-04-20 台中

返回頂端